There is something inherently magical about taking a box of old, broken wax sticks and transforming them into a vibrant work of art. We have all been there: staring at a drawer full of snapped pieces that seem destined for the trash. Instead of discarding them, you can embrace the creative potential of melted crayon crayons. This simple crafting technique has taken the DIY world by storm, offering an accessible, affordable, and visually stunning way to repurpose wax while creating unique home decor or personalized gifts. Whether you are a parent looking for a weekend activity or an artist seeking a new medium, working with wax allows for endless experimentation with color gradients, textures, and abstract forms.
The Science and Art Behind the Wax
At its core, the process of creating art with melted crayon crayons relies on the low melting point of paraffin wax. Because these art supplies are engineered to soften at relatively low temperatures, they are perfect for craft projects that require heat-based manipulation. When heat is applied, the wax transitions from a solid state into a viscous liquid, allowing colors to swirl, blend, and drip in ways that mimic professional oil painting techniques, albeit with a more tactile and vibrant result.
Before diving into your first project, it is essential to understand the basic requirements. You do not need expensive equipment; usually, a heat source (like a hair dryer, oven, or silicone mold setup) and a surface to work on are more than enough. The aesthetic appeal lies in the unpredictability of the wax; as it flows, it creates organic patterns that are impossible to replicate, ensuring that every single creation remains one-of-a-kind.
Essential Supplies for Your Project
To get started with your artistic endeavors, you will need to gather a few supplies. Keep in mind that quality varies, but even standard school-grade wax performs beautifully when melted.
- Bulk Crayon Collection: Use your old, broken scraps or buy new boxes for specific color palettes.
- Heat Source: A high-wattage hair dryer for canvas drips or a silicone mold for shaped wax pieces.
- Canvas or Heat-Resistant Surface: Heavy cardstock, wooden boards, or blank canvas panels.
- Adhesive: Strong glue or a hot glue gun to secure pieces in place.
- Protective Gear: Newspaper or a drop cloth to catch stray drips.
| Method | Best For | Difficulty Level |
|---|---|---|
| Canvas Drip | Wall Art/Decor | Easy |
| Silicone Mold | Custom Shapes/Gifts | Intermediate |
| Wax Painting | Textured Portraits | Advanced |
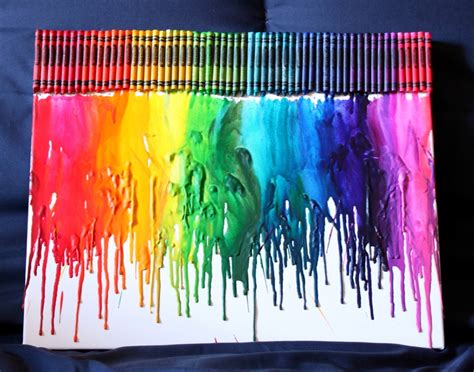
Technique 1: Creating Stunning Drip Art
The most popular way to use melted crayon crayons is the classic "drip" method. This involves arranging crayons at the top of a canvas and using a heat source to liquefy them until they run down the surface in long, dramatic streaks. This creates a high-contrast, modern art aesthetic that looks fantastic in any room.
Start by peeling the paper labels off your wax sticks. This is often the most time-consuming part, but it is necessary to prevent paper bits from burning into your wax. Arrange the sticks in a color gradient—perhaps a rainbow transition or a cool-toned monochromatic scheme. Use a hot glue gun to fix them firmly to the top edge of your canvas. Once they are secure, position your canvas upright against a wall protected by newspaper, and begin heating the crayons with a hair dryer on high power. As the heat hits the wax, it will begin to cascade downward, creating organic, vertical lines of pure color.
⚠️ Note: Always perform this project in a well-ventilated area to avoid inhaling wax fumes, and ensure the hair dryer is kept at a safe distance to prevent the wax from splattering uncontrollably.
Technique 2: Casting Custom Wax Shapes
If you prefer functional art, you can melt your supplies down completely to recast them into fun, thematic shapes. This is an excellent way to recycle old wax while creating personalized items for children. You will need silicone molds—these are available in almost any shape, from stars and hearts to animals and geometric figures.
Begin by sorting your scraps by color. Place the broken pieces into a heat-safe glass bowl or a dedicated melting pot. You can melt them in a double boiler over the stove or in the oven at a low temperature (usually around 200°F). Once the wax is completely liquified, carefully pour it into your silicone molds. Let the wax sit undisturbed for at least an hour until it is completely hard to the touch. Once cooled, simply pop them out of the mold to reveal your new, custom-shaped melted crayon crayons.
💡 Note: Do not mix too many dark colors together, or you will end up with a muddy brown shade. Stick to complementary color palettes to keep your final products bright and vibrant.
Safety and Clean-Up Tips
Working with melted wax requires a degree of caution. Because you are dealing with heat, it is vital to keep your workspace clear of flammable materials. If you are working with children, always supervise them closely during the heating phase. When it comes to cleanup, wax is actually much easier to remove than you might think. If it spills on a hard surface, let it cool completely until it hardens, and then gently scrape it away with a plastic putty knife or your fingernail. Avoid using boiling water to clean up large spills, as this can cause the wax to spread and become harder to manage.
Creative Applications for Your Creations
Beyond simple wall art and molded shapes, these projects can be adapted for a variety of uses:
- Custom Party Favors: Create heart-shaped wax pieces for wedding or birthday party favors.
- Mixed Media Collages: Incorporate melted wax drips into traditional acrylic or oil paintings for added texture.
- Educational Tools: Make extra-large, custom-shaped wax sticks for toddlers who are just learning to grasp objects.
- Abstract Textures: Use a hot knife to carve into hardened wax surfaces to reveal layers of color hidden beneath.
As you become more comfortable with these methods, you will find that the only real limitation is your own imagination. The beauty of this medium lies in the fact that it is incredibly forgiving; if you don't like how a project turns out, you can simply apply more heat, scrape the surface, or melt it all down and start fresh. By repurposing old art supplies into these creative outputs, you are not only reducing waste but also developing a deeper understanding of color theory, heat transfer, and sculptural form.
The journey of transforming simple items into expressions of creativity provides a satisfying sense of accomplishment. Whether you are aiming for a minimalist drip aesthetic on a large canvas or pouring vibrant, custom-shaped wax for a gift, the process remains therapeutic and engaging. Experimenting with different melting temperatures, color combinations, and application surfaces will eventually help you develop a unique style. By embracing the fluidity and bold color profile inherent in this craft, you can continue to find endless inspiration within the humble remnants of your old wax collection, turning what was once perceived as waste into a genuine centerpiece of artistic expression.
Related Terms:
- melting crayons in oven
- crayons melted together
- uses for old crayons
- melted crayons crafts
- melted crayons on canvas
- how to melt crayons safely