Mastering the art of handwriting is a journey that often begins with the most fundamental building blocks of the alphabet. Among these, the lowercase n in cursive serves as a crucial bridge between simple strokes and complex, fluid writing. Because it consists of two identical arches, it is one of the most frequently used letters in the English language. Learning to write this character with precision not only improves your overall penmanship but also enhances the rhythmic flow of your script. Whether you are a student refining your style or an adult looking to rediscover the elegance of cursive, understanding the nuances of this specific letter is essential.
Understanding the Structure of a Cursive 'n'
To write a beautiful lowercase n in cursive, you must first visualize its anatomical structure. Unlike the printed 'n', which often features sharp corners, the cursive version is composed of two rounded humps or "arches." The movement is rhythmic: up, curve, down, back up the same line, curve again, and finish with a tail that connects to the next letter.
The key to success lies in maintaining consistent spacing between the two humps. If they are too close, the letter looks like a cramped 'm' or a shaky 'r'; if they are too far apart, the fluidity of your sentence is interrupted. By focusing on the pendulum motion of your hand, you can create a letter that looks balanced and graceful.
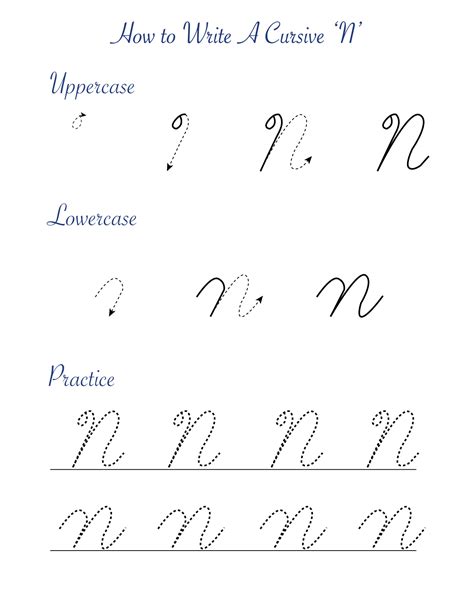
Step-by-Step Guide: How to Write a Lowercase N in Cursive
Achieving consistency requires muscle memory. Follow these steps to perfect your technique:
- The Starting Point: Begin at the baseline. Draw a curved upward stroke toward the middle line, similar to the start of an 'i' or 'm'.
- The First Arch: Curve over at the top and bring the stroke straight down to the baseline.
- The Second Arch: Instead of lifting your pen, retrace your path slightly upward along the same line, then curve over to form a second identical arch.
- The Exit Tail: Finally, bring the stroke down to the baseline and extend a small "tail" to the right. This tail is vital as it provides the anchor point for your next letter.
💡 Note: Ensure your arches are rounded rather than pointed. Sharp, rigid angles often indicate that you are gripping the pen too tightly, which can lead to hand fatigue.
Comparing Cursive Letters with Similar Arches
Many beginners confuse the lowercase n in cursive with other letters that share a similar shape, such as 'm' or 'h'. Distinguishing between these is vital for legibility. The following table provides a clear breakdown of how to differentiate these related characters:
| Letter | Number of Arches | Primary Difference |
|---|---|---|
| n | Two | The simplest of the arch-based letters. |
| m | Three | Features an extra arch compared to the 'n'. |
| h | One (plus ascender) | Starts with a tall loop that reaches the top line. |
Common Mistakes and How to Avoid Them
Even with practice, certain habits can detract from the quality of your cursive. One common error is "the floating letter," where the letter does not start or end on the baseline. This makes the text appear erratic. Another frequent mistake is inconsistent height. Because the lowercase n in cursive is a short letter, it must remain within the x-height zone (the space between your baseline and the midline).
To avoid these pitfalls, practice on lined paper. Pay attention to the "retracing" phase of the second arch. If you find yourself drawing two separate humps that don't connect properly, slow down your pace and focus on keeping the pen on the paper during the transition between the first and second arch.
Exercises to Improve Your Penmanship
To solidify your skill, incorporate these drills into your daily practice:
- The 'nan' Drill: Write "nan" repeatedly. This helps you transition from the exit tail of the first 'n' to the entrance of the 'a', and back into the second 'n'.
- The 'union' Practice: Words that contain 'un' or 'nu' combinations are excellent for practicing the connectivity of the letter.
- Rhythmic Repetition: Write a row of ten 'n's without lifting your pen. Focus on making each one look identical in width and height.
💡 Note: Always keep your wrist loose. If you notice your writing becoming shaky or jagged, take a moment to stretch your hand and reset your posture.
The Importance of Consistency in Cursive Writing
The beauty of cursive script is found in the connection between letters. When you master the lowercase n in cursive, you aren't just learning one character; you are learning how to manage the flow of your writing. Because 'n' connects to almost every other letter in the alphabet, it acts as a gatekeeper for your fluency. When you can execute this letter effortlessly, the surrounding letters will naturally fall into place, leading to a much more professional and sophisticated handwriting style.
Remember that improvement is a gradual process. Comparing your work to your previous attempts is the best way to track your progress. Over time, the deliberate movements you practice today will become second nature, allowing you to write with both speed and elegance. By focusing on the fundamentals of the arch, the baseline alignment, and the connectivity of your strokes, you will find that your penmanship improves significantly, turning every sentence into a work of art.
Related Terms:
- all the letters in cursive
- cursive alphabet lowercase letters
- n in cursive worksheets
- cursive capital and lowercase letters
- cursive writing n worksheets
- printable n in cursive