Embarking on the journey of assisted reproduction is a significant life event, and understanding the IVF process timeline is crucial for managing expectations and reducing anxiety. In vitro fertilization (IVF) is a complex, multi-stage procedure that requires precision, patience, and careful medical supervision. While every patient’s medical history is unique and may alter the exact duration, breaking down the typical sequence of events helps demystify the path toward potential pregnancy. By gaining a clear perspective on what happens during each phase—from initial consultations to the final pregnancy test—you can better prepare yourself emotionally and logistically for the road ahead.
Understanding the Typical IVF Cycle Duration
A single cycle of IVF generally spans between four to six weeks, starting from the beginning of your menstrual cycle until the pregnancy test. However, this timeline does not account for the preliminary testing, genetic screening, or any potential waiting periods mandated by your specific clinic. Many patients require multiple cycles, so it is helpful to view the process as a marathon rather than a sprint.
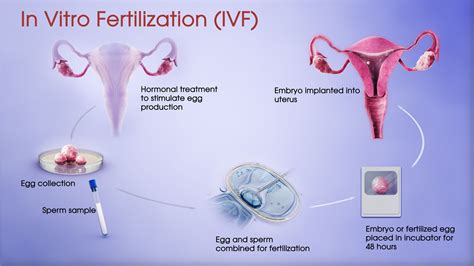
The core IVF process timeline can be segmented into the following key phases:
- Preparation and Baseline Testing: Assessment of hormonal levels and reproductive anatomy.
- Ovarian Stimulation: Daily injections to encourage the growth of multiple follicles.
- Egg Retrieval: A minor surgical procedure to collect the mature eggs.
- Fertilization and Embryo Development: The creation and growth of embryos in the laboratory.
- Embryo Transfer: Placing the embryo into the uterus.
- The Two-Week Wait: The period of anticipation until the pregnancy test.
| Phase | Estimated Duration | Primary Goal |
|---|---|---|
| Ovarian Stimulation | 8–12 Days | Produce multiple mature eggs |
| Egg Retrieval | 1 Day | Collect eggs for fertilization |
| Embryo Culture | 3–6 Days | Monitor development |
| Embryo Transfer | 1 Day | Implantation into the uterus |
💡 Note: The duration for ovarian stimulation can vary based on how your body responds to the medication, which is why frequent monitoring via ultrasound and blood work is essential during this time.
Phase 1: Preparation and Suppression
Before the stimulation drugs begin, many clinics implement a "suppression" phase. This is often done using oral contraceptive pills or other hormonal medications for a few weeks prior to the cycle start. The goal of this phase is to reset the ovaries and ensure that all follicles are at a similar stage of development before stimulation begins. This helps prevent dominant follicles from maturing too quickly, allowing for a more uniform response once medication starts.
Phase 2: Ovarian Stimulation
Once your baseline is established, the active part of the IVF process timeline begins. You will administer injectable gonadotropins daily to stimulate the ovaries to produce multiple mature eggs, rather than the single egg typically released during a natural cycle. During these 8 to 12 days, you will visit the clinic several times for transvaginal ultrasounds and blood tests. These appointments allow your physician to monitor follicle growth and adjust your medication dosage as needed to maximize results while minimizing the risk of complications.
Phase 3: The "Trigger" and Egg Retrieval
When the follicles reach the optimal size, you will receive a "trigger shot." This is a precisely timed injection that initiates the final maturation of the eggs. Exactly 34 to 36 hours after this shot, the egg retrieval procedure takes place. This procedure is performed under sedation or light anesthesia. Using ultrasound guidance, a physician uses a thin needle to aspirate fluid from the follicles to collect the eggs. The procedure usually takes less than 30 minutes, though you should plan for a full day of recovery afterward.
Phase 4: Fertilization and Laboratory Culture
After the eggs are collected, they are taken to the embryology laboratory. If you are using fresh sperm, it is prepared and combined with the eggs shortly after retrieval. If using frozen sperm or if your case requires ICSI (Intracytoplasmic Sperm Injection)—where a single sperm is injected directly into an egg—this is done during this time. The embryos are then monitored for three to six days. Some patients opt to wait until the "blastocyst" stage (day 5 or 6) for transfer, as these embryos generally have a higher implantation potential.
⚠️ Note: Not every egg will fertilize, and not every fertilized egg will reach the blastocyst stage. It is normal to see a decline in the number of embryos as the days progress in the laboratory.
Phase 5: Embryo Transfer and The Two-Week Wait
The embryo transfer is a relatively quick and painless procedure that does not usually require anesthesia. Using a thin catheter, the embryologist and physician place the selected embryo into the uterine cavity. Following the transfer, you enter the "two-week wait." This is often considered the most challenging part of the IVF process timeline. During this period, you will remain on progesterone support to maintain the uterine lining. You will then return to the clinic for a blood test (beta hCG) to confirm if the implantation was successful.
Individual Factors Affecting the Timeline
While the steps listed above provide a standardized look at the process, several factors can extend the timeline. These include the need for Preimplantation Genetic Testing (PGT), which requires freezing the embryos and waiting for results before proceeding with a Frozen Embryo Transfer (FET). Additionally, some patients may require multiple stimulation cycles to gather enough embryos for testing or future use. Your medical team will customize the approach to prioritize your long-term success rather than rushing to a transfer before your body is ready.
Navigating the various stages of assisted reproduction requires a balance of medical diligence and personal resilience. By understanding the standard structure of the treatment—from the early days of medication management to the final milestone of the pregnancy test—you gain a clearer map of what to expect. While individual responses to treatment vary, being well-informed helps create a sense of control during an experience that can often feel unpredictable. Remember that your medical team is your primary resource for addressing any deviations from these milestones, and their focus remains on optimizing your health and safety throughout every stage of the cycle. Embracing the patience required for this process is a vital component of the journey, ensuring that you are as prepared as possible for each step forward.
Related Terms:
- ivf process timeline pdf
- ivf process timeline uk
- ivf process step by step
- ivf timeline
- ivf cycle timeline chart
- ivf timeline start to finish