A dripping faucet is more than just an annoying sound; it is a silent thief, wasting gallons of water and inflating your monthly utility bill. For many homeowners, the thought of calling a plumber to fix a simple leak feels like an unnecessary expense. Fortunately, learning how to fix a leaky kitchen faucet with two handles is a straightforward DIY project that can save you significant time and money. With a few basic tools and a bit of patience, you can stop that constant drip in under an hour.
Tools and Materials You Will Need
Before you begin the repair, gather all the necessary supplies to ensure the process goes smoothly. Having everything within arm’s reach prevents unnecessary trips to the hardware store.
- Adjustable wrench
- Phillips and flat-head screwdrivers
- Replacement O-rings or seat washers (specific to your faucet model)
- Plumber’s grease (silicone-based)
- Needle-nose pliers
- Penetrating oil (if the handle is stuck)
Identifying Your Faucet Type
Most two-handle kitchen faucets use either a compression cartridge or a stem-based system. Knowing which type you have is the first step in determining how to fix a leaky kitchen faucet two handle. Generally, if you have to tighten the handle down significantly to stop the water, it is likely a compression faucet. If the handle turns only a quarter or half turn, it is likely a cartridge or ball-type faucet.
| Faucet Component | Common Issue | Typical Fix |
|---|---|---|
| Compression Stem | Worn seat washer | Replace the rubber washer |
| Cartridge | O-ring failure | Replace cartridge/O-ring |
| Valve Seat | Corrosion/Pitting | Re-seat or replace seat |
Step-by-Step Repair Guide
Once you have identified your faucet type and gathered your tools, follow these steps to perform the repair safely and effectively.
1. Turn Off the Water Supply
Before disassembling any part of the plumbing, locate the shut-off valves under the kitchen sink. Turn them clockwise until they are completely closed. Afterward, open the faucet handles to release any trapped pressure and ensure the water has stopped flowing entirely. Tip: Place a towel over the drain to prevent small screws or washers from falling down the pipes.
2. Remove the Faucet Handles
Most handles have a decorative cap covering the screw. Use a thin flat-head screwdriver to gently pry off the cap. Once removed, unscrew the handle screw and pull the handle assembly upward. If it feels stuck due to mineral buildup, apply a small amount of penetrating oil and let it sit for a few minutes before trying again.
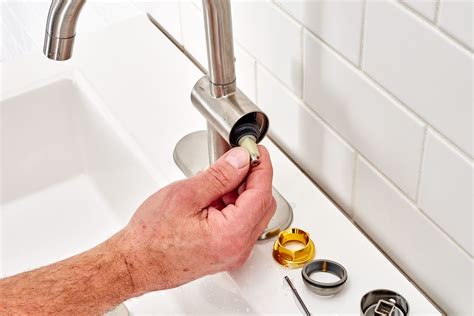
3. Access and Remove the Valve Stem or Cartridge
Using your adjustable wrench, loosen the packing nut or the bonnet nut holding the stem or cartridge in place. Turn counter-clockwise carefully. Once the nut is loose, pull the stem or cartridge straight out. You may need to use pliers if the component is tightly seated.
4. Replace Worn Parts
Inspect the rubber O-rings, washers, and the cartridge itself for signs of cracks, flat spots, or mineral deposits. If the washer at the bottom of the stem is worn, unscrew the small brass screw holding it in place and swap it for a new one. If the entire cartridge is faulty, it is often best to replace the whole unit with an exact match from the hardware store.
5. Reassemble and Test
Clean the inside of the faucet body to remove any lime scale or debris. Apply a thin layer of plumber’s grease to the new O-rings to ensure a watertight seal. Reinsert the stem or cartridge, tighten the nut, and reattach the handle. Slowly turn the water supply back on and check for leaks.
💡 Note: Always take the old parts with you to the store to ensure you buy the exact size replacements, as there are hundreds of variations in plumbing components.
Maintaining Your Faucet Long-Term
Once you have successfully learned how to fix a leaky kitchen faucet two handle, keeping it in good condition is vital. Regularly cleaning the aerator at the tip of the spout prevents mineral buildup that can cause pressure issues. Additionally, avoid overtightening the handles, as this compresses the washers unnecessarily and causes them to wear out much faster than intended.
Taking the initiative to repair your own fixtures is a rewarding way to maintain your home. By following these steps, you not only eliminate the irritating sound of a dripping faucet but also contribute to water conservation efforts. Should you encounter persistent leaks after replacing the internal components, it may be a sign of deeper corrosion within the faucet body, which might require a full replacement. However, in the vast majority of cases, a simple washer or cartridge swap is all that is needed to restore your faucet to full working order, leaving your kitchen running smoothly once again.
Related Terms:
- dripping faucet repair two handle
- remove two handle bathroom faucet
- repair kitchen faucet single handle
- fix dripping faucet two handle
- faucet troubleshooting cartridge is removed
- replace two handle faucet cartridge